
Part 3: How to organize your test
Organization is the key to a successful company, especially when it comes to long-term growth and profitability. For your testing, you will want to be very clear and organized with the instructions and information being given to the test subjects. It is also meaningless to run tests or do research unless you have ways to organize the data for review and improvements. In this part, I will show you some easy steps for organizing the tests, and also for noting and organizing the results.
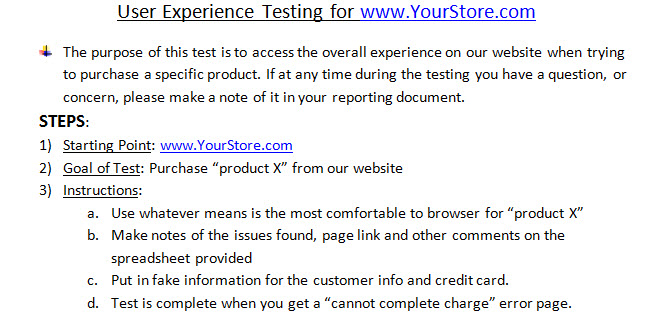
Organizing the test: It is very important to create an easy-to-use document for instructions, and also for the test subjects to make their notes on the results. It is important to go through the test(s) yourself, to make sure that your instructions and links are correct. Clear instructions on the starting point, the goals of the test, and any additional instructions are essential in running a truly useful “User Experience Test.” You can use Word, Open Office, Google Docs or any other similar program. Here is an example of a simple instruction doc:
Call Atwoodz at (800)961-7427 for questions or support!
Organizing the results: One of the preferred methods, although not very high-tech, is using a spreadsheet through Excel, Google Doc or Open Office. If you have access to some other database or reporting system, go ahead and use it, but as Open Office and Google Doc are free, they would fall under trying to maintain the smallest budget for testing. You can start with a simple spreadsheet and progress to using formulas and other functionality to start working on your website’s User Happiness Algorithm, that I will explain in Part 4 of this blog series. This part is about laying the groundwork for organizing your DIY User Experience Testing, we will add more columns to the spreadsheet later. Here is a simple start for a spreadsheet, for a purchase test, using Excel:

Call Atwoodz at (800)961-7427 for questions or support!
You can add additional details and fields, but you want to make sure that you have all the information necessary so you can replicate issues and/or refer back to this report in the future. The idea of the spreadsheet above is for open-thoughts on a specific process, you can guide them in their answers by providing multiple choice answers or asking direct questions about specific pages, like “Were the payment options easy to understand?” or “How many payment options were there?” For competition comparison tests, I would recommend using a similar spreadsheet, but it would ask them to rate the websites (1-10) or rank them versus each other.
The key to this part is creating something that makes sense and works for your business. In order for you to get the best results from your tests and website, organization is one of the most crucial steps to success. If your website’s target is contact submission or something else, there should still be clear steps and identifiable goals for your test.
Now that you have gone to the point of organizing your tests, the next part will be working on your “User Happiness Algorithm.” In Part 4, I will show you how to come up with quantifiable scores for your website’s user experience tests.
Check back in two weeks for the next FREE installment!